Link to original instructions.
The Story of your Starter: This starter was born in 1849, from a bread starter reportedly carried by Basque gold miners to San Francisco at the start of the Gold Rush. The (boring) starter they brought mixed with the unique San Francisco yeasts and lactobacilli, and, according to the miners, suddenly became sour, chewier, and delicious. Local bakeries quickly began using this starter, and one of them kept the same starter going continuously from the 1850s to just a few years ago! Before they closed, someone snuck some of this starter out (shhh!) and brought it all the way to Toronto’s most awesome and fun little neighbourhood, Kensington Market, where it now happily lives churning out loaf after loaf of amazing bread. Are you ready to get your little monster out of its cage? Remember: sourdough needs courage!
You need: 1. A clean jar or bowl (not metal they say, I don't know why). 2. Clean, lukewarm water. If you have a water filter or source of pure water use this. 3. All-purpose flour.
DAY ONE: Mix 1/2 cup lukewarm water and the package of starter powder in a bowl for 1-2 min, then add 1/2 cup plus 2 tablespoons all-purpose flour. We want a thick pancake batter consistency, so add more flour or water to get it. Cover bowl with cling wrap. Put it in a semi-warm place, i.e. the oven with the light on. Put a piece of tape over your bake button! You will forget and preheat your oven to 500F. I did this and felt guilty!! Note: some ovens get very hot (100F or more) from just the light. If you suspect you have an over-enthusiastic oven light use the top of your fridge instead, which will work just fine.
DAY TWO: Just stir - Kinda vigorously. Re-cover with cling wrap. Back to the oven or fridge top.
Note: We want a THICK starter. For the remaining days slowly mix in the water second, and only stir in enough to end up with a fully hydrated but thick consistency. If you tilt the jar it should move like slow lava!
DAY THREE: There might be bubbles now, and maybe even a bit of a sour smell. An additional 1/2 cup all purpose flour and up to 1/2 cup pure lukewarm water, stirring thoroughly. Back in the oven.
DAY FOUR: 1/2 cup flour and up to 1/2 cup water. Say something pleasant to your starter. Back to the oven home.
DAY FIVE: DUMP HALF OF YOUR STARTER INTO THE GARBAGE. Just do it, be merciless. Add 1 cup flour to the bowl and (up to) 1 cup pure water and place back into the oven.
Did you know that there are 5 billion Lactobacilli (and 50 million yeasts) in a single tablespoon of active sourdough starter? Everyone of them is starving for their favorite meal (flour and water yum yum) and if there are too many of them there just won’t be enough food in the bowl. On day five we are taking a half-starving bloated peasantry of starter, culling the herd, and creating a lean mean starter army. If you haven’t figured out by now, serious things are happening in your kitchen. Reminder: Keep it thick! It should be at least a bit hard to stir.
DAY SIX: Back to half cup of flour, (up to) half cup of water, stir, oven, this is easy, be patient…
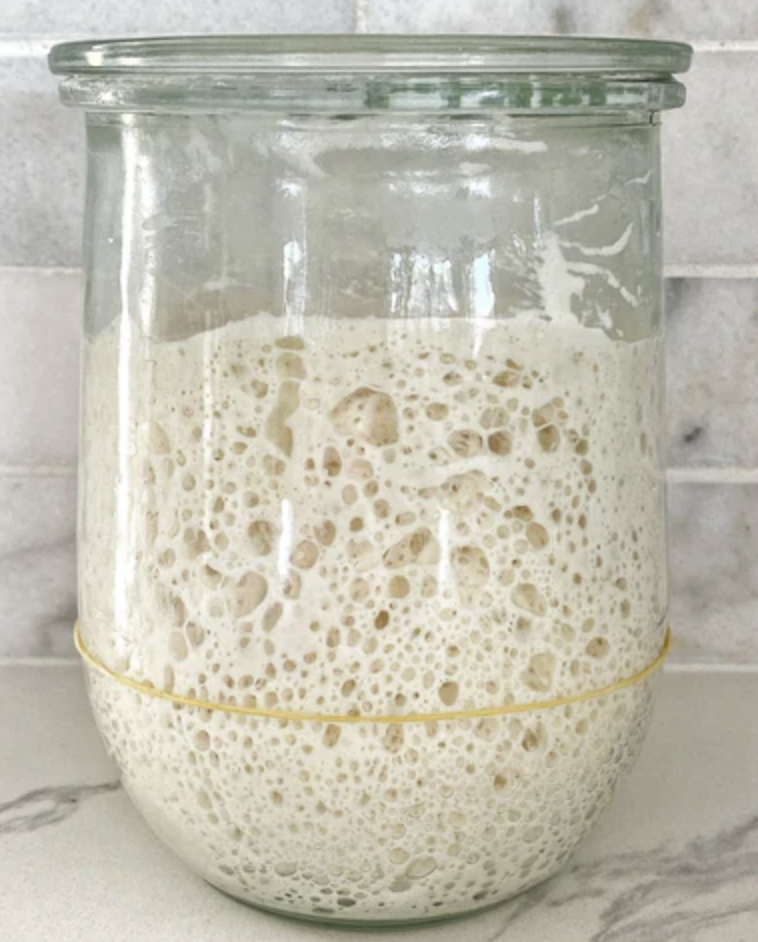
DAY SEVEN: CONGRATULATIONS at this point you probably have a fully active starter! How can you tell? 1. Lots of bubbles of different sizes, and, 2. When you feed it, it doubles in size over the next 6-8 hours. I almost wanted to keep #2 to myself. Feeding your starter before bed and waking up to an overflowing mason jar messing up your kitchen is an important rite of passage. Not there yet? Keep discarding then feeding (see over) and you will be soon, trust me. Note: after it doubles (or triples) it will gradually shrink again. This is normal!
If you bake a lot: Keep in on the counter, cover with cling wrap. Or in a slightly warmer spot like on top of the fridge. Or sleep with it next to your body to make sure it's not cold at night, as did the San Francisco Gold Rush miners in 1848 (note: they really did this). Discard then feed it daily, at around the same time.
If you bake infrequently: Keep in the fridge, also covered with cling wrap. 1-2 days before you bake you will pull it from the fridge and get it active again. How? Discard then feed it, put an elastic band at the level. See if it doubles in 8 hours. If so… it’s Active! If not… feed it again! If unused, discard then feed it once a week.
How to Feed: Discard first, down to approx. ½ cup. Your starter will like to be fed a 1:1:1 ratio of starter flour and water. Some people do this by scale weight (by volume you will be adding less water than flour) but frankly just use your eyes and go by consistency and you will also be fine. Depending on your baking needs you will likely be throwing out starter before feeding to keep it to a manageable size.
Ingredients
Directions
You need: 1. A clean jar or bowl (not metal they say, I don't know why). 2. Clean, lukewarm water. If you have a water filter or source of pure water use this. 3. All-purpose flour.
DAY ONE: Mix 1/2 cup lukewarm water and the package of starter powder in a bowl for 1-2 min, then add 1/2 cup plus 2 tablespoons all-purpose flour. We want a thick pancake batter consistency, so add more flour or water to get it. Cover bowl with cling wrap. Put it in a semi-warm place, i.e. the oven with the light on. Put a piece of tape over your bake button! You will forget and preheat your oven to 500F. I did this and felt guilty!! Note: some ovens get very hot (100F or more) from just the light. If you suspect you have an over-enthusiastic oven light use the top of your fridge instead, which will work just fine.
DAY TWO: Just stir - Kinda vigorously. Re-cover with cling wrap. Back to the oven or fridge top.
Note: We want a THICK starter. For the remaining days slowly mix in the water second, and only stir in enough to end up with a fully hydrated but thick consistency. If you tilt the jar it should move like slow lava!
DAY THREE: There might be bubbles now, and maybe even a bit of a sour smell. An additional 1/2 cup all purpose flour and up to 1/2 cup pure lukewarm water, stirring thoroughly. Back in the oven.
DAY FOUR: 1/2 cup flour and up to 1/2 cup water. Say something pleasant to your starter. Back to the oven home.
DAY FIVE: DUMP HALF OF YOUR STARTER INTO THE GARBAGE. Just do it, be merciless. Add 1 cup flour to the bowl and (up to) 1 cup pure water and place back into the oven.
Did you know that there are 5 billion Lactobacilli (and 50 million yeasts) in a single tablespoon of active sourdough starter? Everyone of them is starving for their favorite meal (flour and water yum yum) and if there are too many of them there just won’t be enough food in the bowl. On day five we are taking a half-starving bloated peasantry of starter, culling the herd, and creating a lean mean starter army. If you haven’t figured out by now, serious things are happening in your kitchen. Reminder: Keep it thick! It should be at least a bit hard to stir.
DAY SIX: Back to half cup of flour, (up to) half cup of water, stir, oven, this is easy, be patient…
DAY SEVEN: CONGRATULATIONS at this point you probably have a fully active starter! How can you tell? 1. Lots of bubbles of different sizes, and, 2. When you feed it, it doubles in size over the next 6-8 hours. I almost wanted to keep #2 to myself. Feeding your starter before bed and waking up to an overflowing mason jar messing up your kitchen is an important rite of passage. Not there yet? Keep discarding then feeding (see over) and you will be soon, trust me. Note: after it doubles (or triples) it will gradually shrink again. This is normal!
If you bake a lot: Keep in on the counter, cover with cling wrap. Or in a slightly warmer spot like on top of the fridge. Or sleep with it next to your body to make sure it's not cold at night, as did the San Francisco Gold Rush miners in 1848 (note: they really did this). Discard then feed it daily, at around the same time.
If you bake infrequently: Keep in the fridge, also covered with cling wrap. 1-2 days before you bake you will pull it from the fridge and get it active again. How? Discard then feed it, put an elastic band at the level. See if it doubles in 8 hours. If so… it’s Active! If not… feed it again! If unused, discard then feed it once a week.
How to Feed: Discard first, down to approx. ½ cup. Your starter will like to be fed a 1:1:1 ratio of starter flour and water. Some people do this by scale weight (by volume you will be adding less water than flour) but frankly just use your eyes and go by consistency and you will also be fine. Depending on your baking needs you will likely be throwing out starter before feeding to keep it to a manageable size.
